PNG to SVG
Learn when PNG-to-SVG conversion works well, how transparent PNG files behave, and how to prepare clean PNG assets for vector output.
Quick Summary
- PNG-to-SVG conversion works best when the PNG is a logo, icon, badge, or simple graphic with clear edges.
- Transparent PNG files can convert well, but antialiasing around edges may still create extra paths.
- A good PNG-to-SVG workflow starts with source preparation and tracing, then reviews the automatically cleaned output before choosing a delivery format.
- Category
- Conversion
- Difficulty
- Beginner
- Reading Time
- 6 min
- Related Tool
- Image to SVG
- Best For
- Transparent logos, Icons, Simple graphics
- Avoid For
- Photos, Screenshots, Soft shadows
Introduction
PNG is one of the most common source formats for SVG conversion because many logos, icons, badges, and UI graphics are exported as PNG files. A clean PNG can often become a useful SVG, especially when it has sharp edges, transparent background, and a limited color palette.
But PNG-to-SVG conversion is still tracing. The generated SVG is not the original design file. It is a vector interpretation of the pixels in the PNG. That means the quality of the output depends heavily on the quality and simplicity of the source image.
Use this guide when you have a PNG asset and need to decide whether converting it to SVG will produce a better web asset.
How PNG tracing works
PNG stores pixels. SVG stores shapes. When a PNG contains a simple mark, the tracing process can identify areas of color and convert them into vector paths. When a PNG contains subtle texture, antialiasing, shadows, or photographic detail, those pixels may become many small paths.
Transparent PNG files often work well, but transparency alone does not guarantee a clean SVG. A logo with a transparent background may still have soft edge pixels that become noisy vector shapes. The best source PNG is usually large enough to have clear edges, but simple enough that the important shapes are obvious.
What transparency changes
PNG supports an alpha value for every pixel. Along a curved or diagonal edge, many pixels may be only partly transparent. Those pixels make the raster edge look smooth, but a tracer must decide whether to preserve them as additional colored regions, merge them into a nearby shape, or discard them.
That makes transparent PNG review different from general image tracing. Check these areas specifically:
- Outer silhouettes for faint halos or isolated fragments.
- Counters and holes inside letters, icons, and badges.
- Semi-transparent shadows that may become solid-looking bands.
- Small details that disappear when transparency thresholds are simplified.
Transparency can remove the need to trace a background rectangle. It does not recover the clean curve or object boundary that existed in the original design file.
Which PNG files convert well?
| PNG source | SVG suitability | Notes |
|---|---|---|
| Flat logo with transparency | High | Usually the strongest PNG-to-SVG candidate. |
| Solid monochrome icon | High | Often converts into simple, reusable paths. |
| Badge with a few colors | Medium to high | Works well if text and edges remain clear. |
| Screenshot saved as PNG | Low | UI text, antialiasing, and many details often create heavy output. |
| Photo saved as PNG | Low | PNG format does not make photographic content suitable for SVG. |
| Soft shadow graphic | Medium to low | Shadows often become complex shapes or visual artifacts. |
The important distinction is content, not file extension. A simple logo PNG can be a good SVG candidate. A photo saved as PNG is still a photo.
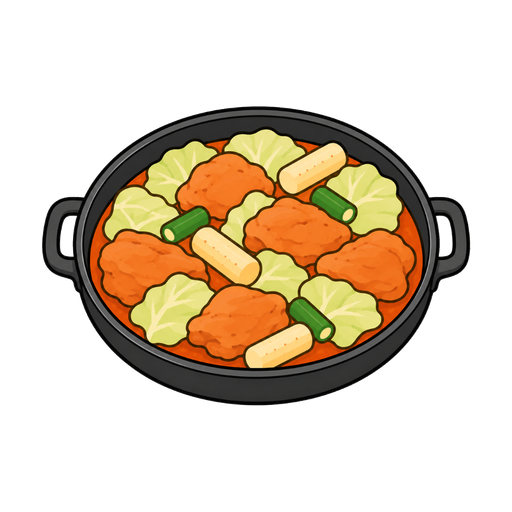
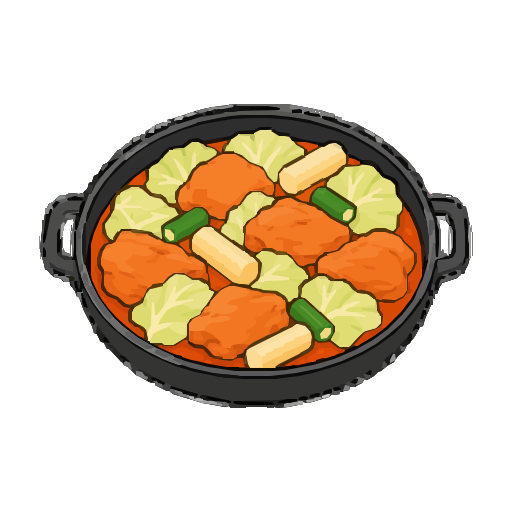
Real conversion example: transparent sticker PNG
This result was measured in SVGKIT on September 13, 2026, using the default Color mode with the original background preserved. Transparency survived the conversion, but the colored details and outlines required substantially more paths than a simple logo.
Transparent illustrated sticker
The transparent background remains usable, but 762 paths are needed to reproduce the pan, ingredients, outlines, and small food details. This is practical only when scalable output matters enough to justify the added structure.
- Source
- 220,647 B
- SVG
- 106,949 B
- Paths
- 762
Measured: · Settings: Color / Original
The smaller result does not automatically make it simple. For stickers and illustrated assets, review transparency, small facial features, lettering, and edge quality at the sizes where the SVG will actually be used.
For this file, the SVG is about 51.5% smaller than the PNG, but it contains 762 paths. At a 320-pixel preview, the pan's dark outline is visibly less even, especially around the handles. The transparent background survives, but the outer edge is not equivalent to the source. For a sticker shown at one fixed small size, keep the PNG unless vector delivery provides a concrete benefit and the edge changes are acceptable.
Common mistakes
Using a tiny PNG as the source
Small PNG files may not contain enough detail for clean tracing. Upscaling a tiny image does not restore missing shape information. Start from the highest-quality source available.
Assuming transparent background means clean output
Transparency helps, but soft edges and antialiasing can still create extra paths. Review the edges after conversion.
Converting screenshots because they are PNG files
Screenshots are usually poor SVG candidates. Text rendering, shadows, borders, and compressed UI details often turn into noisy markup.
Assuming automatic cleanup replaces review
SVGKIT already cleans the traced SVG before download. Inspect the final edges and transparency; a second cleanup pass cannot repair a poor trace.
Best practices
- Use the original logo or icon export when possible.
- Prefer PNG files with clear edges and limited colors.
- Crop extra whitespace before conversion.
- Remove noisy backgrounds before tracing.
- Avoid converting screenshots unless the image is extremely simple.
- Review the output at small and large sizes.
- Inspect the automatically optimized SVG after conversion.
- Keep the PNG source for comparison and fallback.
Practical workflow
- 1Inspect the PNG and decide whether its content is shape-based.
- 2Crop whitespace and remove background noise.
- 3Convert the PNG with a color-preserving trace mode first.
- 4Review edges, holes, transparency, and color boundaries.
- 5Review the final SVG; cleanup is already included.
- 6Compare file size and visual quality against the original PNG.
If the generated SVG is larger, less accurate, or harder to maintain than the PNG, keep the raster file. PNG-to-SVG conversion is useful only when the resulting vector is easier to use.
SVGKIT Tip
SVGKIT Insight
FAQ
Can every PNG be converted to SVG?
Technically many PNG files can be traced, but not every result is useful. Logos, icons, and simple graphics work best. Photos and screenshots usually produce poor SVG output.
Does PNG transparency become SVG transparency?
Transparent areas can be preserved conceptually, but the traced SVG is built from shapes. You should still inspect edges and transparent regions after conversion.
Is PNG-to-SVG always smaller?
No. A simple icon may become smaller as SVG, but a complex PNG can become much larger after tracing.
Should I convert PNG text to SVG?
Only if the text is part of a logo or graphic and does not need to remain editable. If text needs to be selectable, accessible, or translated, use real text in HTML instead.
What should I read next?
Read Raster vs Vector for the pixel-versus-geometry model. SVG Optimization is useful for edited files or other tools' exports; SVGKIT conversion already includes cleanup.
Ready to test a clean PNG?
Use the image-to-SVG tool for logos, icons, badges, and simple transparent PNG files. Review the result before replacing the original asset.
Try Image to SVG